
Pony walls also known as half walls, knee walls, or partial walls are any walls that do not span from a floor to a roof. Typically they span from a floor to a specified height. Pony walls are essential elements of current day construction. Whether creating a divider between spaces or a bar or counter top, a pony wall offers an architectural tool for enabling visibility while still defining and separating of a space. This article covers the correct techniques and methods for building a pony wall out of metal studs.
Pony walls can be built with metal studs or wood studs, and the process is very similar for each. The most important part about a pony wall is the technique for appropriately anchoring the pony wall down with a moment connection type connector that prevents the wall from falling over later. For this we recommend using the ClarkDietrich pony wall. This article will detail the instructions for building a pony wall with metal studs on concrete. For building a pony wall out of wood, please refer to this article.
To watch the process as a video check out our video:
Here is a rough list of what it will take to build the pony wall:
- Layout and chalk-line
- Bottom track with anchors
- Layout studs
- Place pony wall supports
- Anchor pony wall supports
- Screw studs to anchor
- Lay top track
- Finish assembly
Laying The Groundwork for Installation
The first step of any construction project is preparing your area and floor and making sure you have the correct tools. For this installation you will need the following tools:
- Clamps
- Hammer drill for concrete
- Impact driver
- Tape measure
- Chalk line
- Speed Square
- 4' Level
- Torpedo Level
You will need the following materials:
- Structural framing screws
- Light gauge framing screws if using light gauge material
- Pins for attaching the track to the ground
- Pony Wall Support
- Screw down concrete anchors
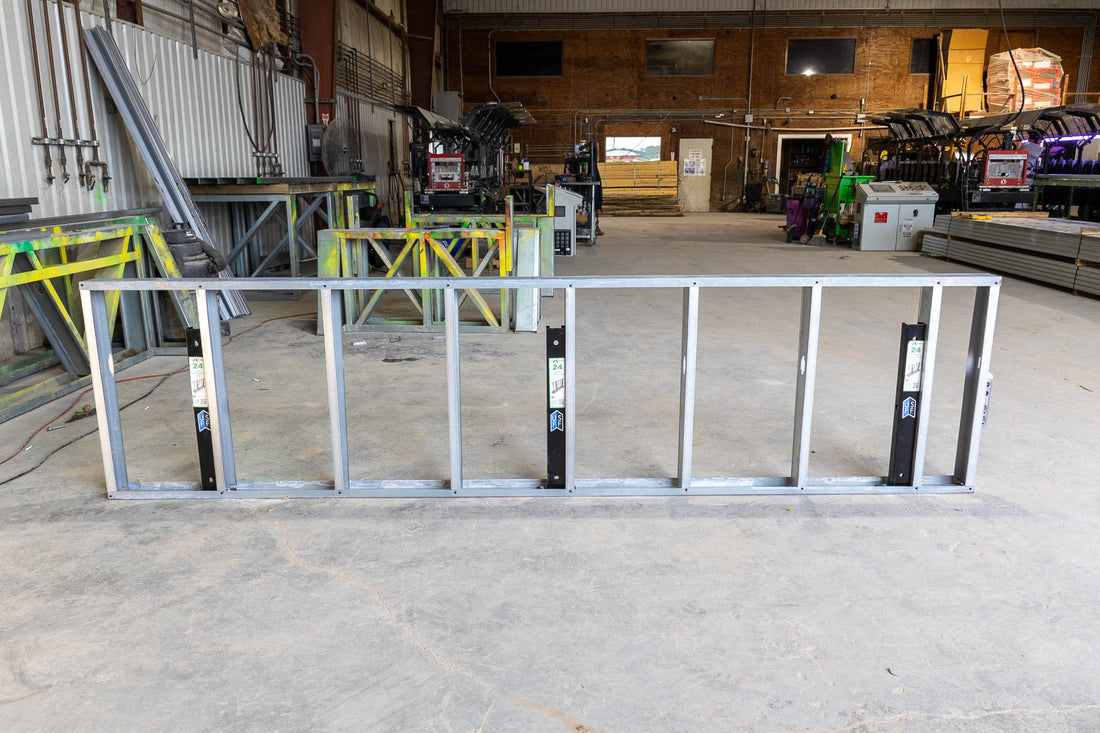
For best results please clean the floor where you will be laying out the pony wall. Once you have all your tools and materials gathered, layout your line with a tape measure and chalk line for where you want to place the pony wall. Determine based on plans or owner preference the height needed for they pony wall and select accordingly a pony wall support that is sufficient for your application. We recommend at least one pony wall support for every 4'. However, please defer to a structural engineer for the quantity needed for your unique application.

After you have laid out the location of the wall, install the bottom track using hammer down or shot down anchors. We like the ramset style PDPA pins for fast installation. Using a tape, mark out the spacing of the studs for your pony wall. Typical spacing might be 16" OC or 24" OC. Do not install any studs yet.

Anchoring and Installing Pony Wall Support
Next select the location of your pony wall supports. For efficiency, you can place the tall vertical portion of the pony wall support offset from the center of a marked stud approximately 1/2". This way you will not need any extra studs. For an even stronger installation, you can place the pony wall support between two laid out studs. You will need to add one or two extra studs to attach the pony wall support to the wall sufficiently.
Once you have selected a location for your pony wall supports mark and drill through the concrete with a hammer drill. Be sure to vacuum up dust so that the hold of the anchor is not compromised. Anchor the pony wall down to the concrete using concrete screw down anchors. Make sure the anchors are fully seated and torqued down with an impact drill sufficiently. Ensure that the pony wall is secure once anchored. There are alternative anchors such as drop in anchors; however, in this demonstration we used Simpson Titen anchors. Ensure that the pony wall anchor is level and shim if necessary.


Finishing the Assembly
After anchoring the pony wall, you can finish the assembly process by cutting the studs to the desired height and installing them on the premarked areas. Studs that sit on top of the foot of the pony wall support will need to be cut slightly shorter to ensure proper fit. We recommend installing the top track and the two outside most studs first. After that attach the studs adjacent to the pony wall support using structural framing screws. We recommend using clamps, a 4' level, and a torpedo level or laser to ensure accuracy. We recommend at least screws in the bottom, middle, and top. Depending upon your expected loads add more screws as needed.


After all your studs are installed, electrical can be ran through the prepunched service holes in the pony walls. Be sure to orient the studs such that the bottom hole lines up with the service hole. This will make your electrical contractor's life much easier. These pony walls can be sheathed with plywood, drywall or any substrate needed.

